Halloween Gradient Quilt
- Cassie Corey
- Oct 23, 2020
- 3 min read

Triangles triangles triangles!
Can you tell I just bought a triangle ruler? Every surface in my craft room is covered in stacks of Halloween fabrics all neatly cut into 5 1/2" equilateral triangles. Why is cutting fabric always so much more addicting than sewing it back together? Let's walk through the story of how my abysmal math skills led to me cutting TWICE as many triangles as I needed for a single quilt...actually we might skip the math bit because I'm still not entirely sure how that happened.
I've been seeing gradient quilts on Pinterest for some time now and most of them are made up of equilateral triangles. Here's a couple that caught my eye in particular. I've saved them to my Pinterest Quilting Board which you should totally check out!
I knew I wanted to make a Halloween quilt since I was so excited about fall. Honestly now I'm more excited about Christmas! Anyways, I got out my fancy notepad and pencil and got to work calculating how many 5 1/2" triangles I would need to make a throw-sized quilt like the ones above. Well, it turns out I still don't know what that number is!
Once I had cut what felt like a million triangles, I cleared the floor of my craft room and with a little help from Q-Tip, began the work of laying out my gradient pattern. Haley came in to help a few times but of course his only feedback was to say, "Looks good, babe!" <3 supportive as always but not very helpful when I'm deciding whether I should swap the orange and black kitten fabric for the orange and black polka dot fabric or maybe the orange and black candy fabric!!! OH THE DECISIONS! I am not a decision-maker. Here are a few of the iterations I went through...


Can't tell them apart? That's ok neither can I.
Once I had spent hours swapping the same triangles back and forth trying to make up my mind, it was time to start sewing the rows together!
Isn't that satisfying? They game together much slower than that in real life. All of these fabrics I picked up from my local Jo-Ann's stores (except the purple pumpkin fabric which I got from my mom). Look how cute!

Basting the quilt was especially fun since I didn't have enough safety pins and Q-Tip kept trying to eat all of the tape that was holding my backing to the floor.
I did some really simple quilting following the existing triangle lines with black thread. Then I bound the quilt with the same orange and black polka-dot fabric I used on the top and in the middle of the backing piece.
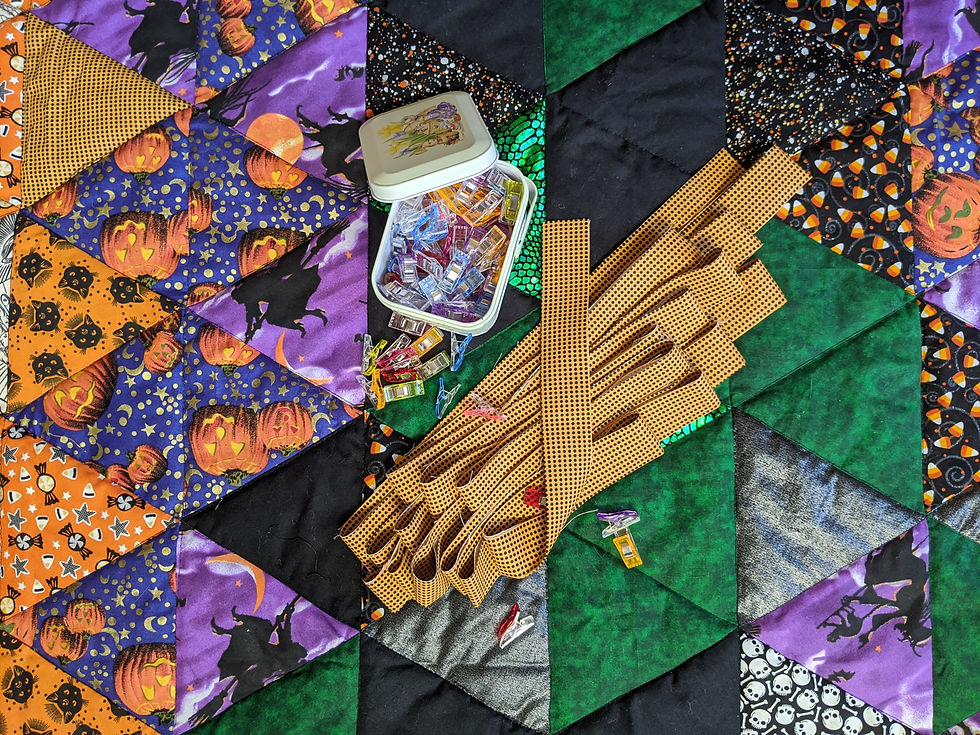
To hold the binding in place, I used these fancy new clips I got off amazon. They came in an adorable little tin. I'm not sure I'm using them correctly because the fabric still bunched a bit but overall I'm really happy with how the quilt came out and this might be the first ever quilt I've made that lays truly flat! Seriously, check this out! SO FLAT!

Next up was the perfect spooky photoshoot! Haley and I took a trip to Sleepy Hollow Cemetery in Concord, MA. If you live in the area and you've never been I highly recommend it!

On our way back, we passed by a huge field with a super chic fence so we pulled over to snap a few more shots. This fence is literally five feet from the road and the buildings in the back left are actually a prison but you would never know it from these pictures! Shh!


I ended up having enough leftover triangles to make TEN table runners! TEN! I haven't gotten around to basting or quilting them yet but I'm thinking they'll make good presents for family who won't mind getting something Halloweeny for Christmas...I might also post a few of them in my Etsy shop so keep an eye out there.
Hope you guys enjoyed reading this! If you have any questions about how I made this quilt or just want to say hi drop a comment below. Thanks for reading!


Comments